| How to Conduct an Advanced Food Item Search |

|
| The Advanced Food Item Search is powerful and flexible. It is a more complex type of search than most NutriBase search types. Mastering this option will help make you an expert NutriBase user.
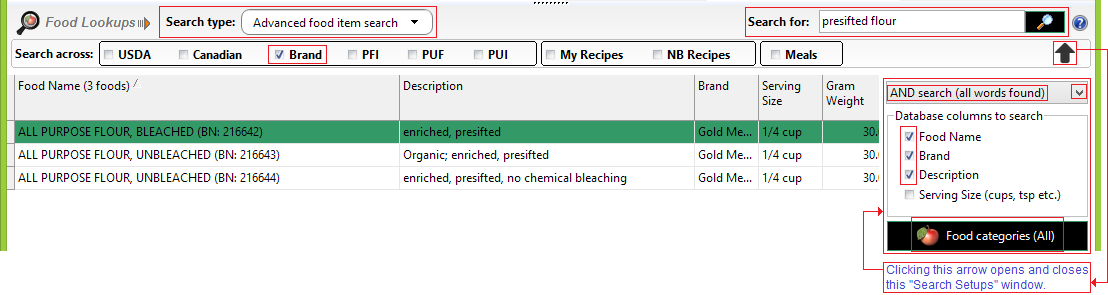
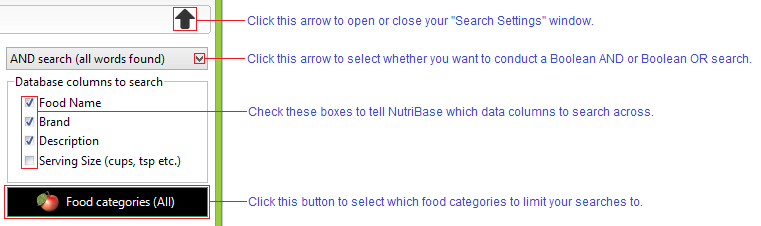
This sample search is an “Advanced food item search” for “presifted flour.” Under Search type we selected the “Advanced food item" search. (Clicking the down arrow in this box will list your other search options.) The “Brand” button is checked to indicate that your search will be limited to Brand Name database only. When you conduct an Advanced Food Item search, the box on the right side of the screen below the “Search” button appears. Clicking this arrow icon opens and closes this box. For convenience, we call this the "Search Setups" box and we take a closer look at this box here:
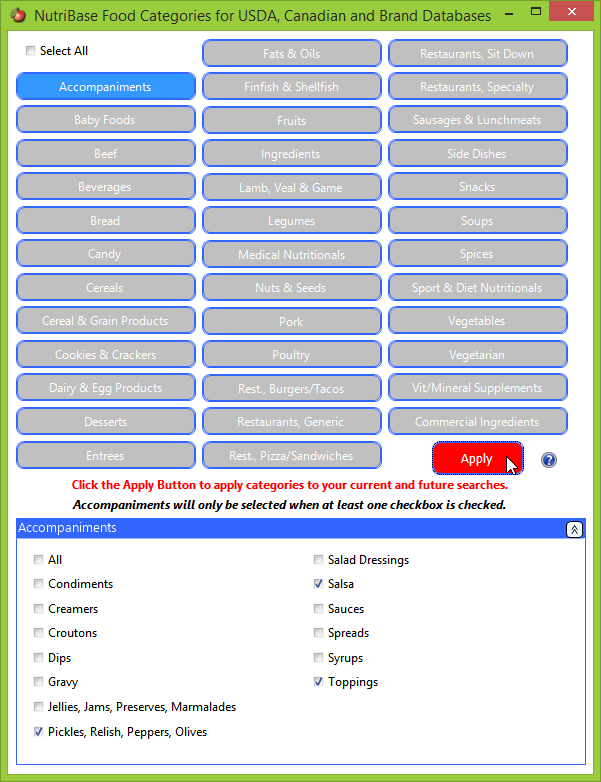
This window let’s you select whether you will conduct an AND type search or an OR type search. If you select an AND type search, ALL the words in your search string must be present to make a food item a valid hit. If you select the OR type search, a valid hit would result if ANY word or words in your search string were present. This Search Setups window also lets you determine which columns of data you want NutriBase to search across. The Food Name Search only searches the database column named "Food Name." The Brand Name Search searches only on the column named "Brand Name." but this Advanced Food Item search lets you search up to four columns: Food Name, Brand, Description, and Serving size. Important. If your search fails, check to make sure these settings are correct. In this example, make sure you check the option to search the Description field. (This is important in this particular case because the search string “presifted” exists only in the Description field – if you didn’t include this field in your search, you wouldn’t locate any hits.) You also have the option to select which food categories you want to conduct your search across. Click the “Food categories” button to select which food categories you want to limit your search to. If you have selected food categories that do not contain your search stings, you will not locate any hits. (For example, you won't find bananas in the Vegetables food category.) The Advanced Food Item Search gives you many search options and using this search type will require you to understand your options. When conducting a search, think about the food categories you want to restrict your search to. Think about the columns in the food category you want to search across. If you want to exclude a certain word in your search result, check the "Exclude from search" option and type in the exclusion string. This might come in handy if you are looking for something like your beef sandwich Recipes but you don't want to see any that contain cheese in the ingredient listing. Note: When you are unable to locate food items, make sure you have the appropriate Food Categories selected – you won’t find a Snickers bar if you told NutriBase to search across the Vegetables food category. To check which food categories you have selected, click the “Food Categories” button. When you click the Food Categories button, you will see the window below. This window allows you to select which food categories NutriBase will search across. In this case, the search will be limited to the NutriBASe food category called "Accompaniments." Furthermore, it is limited to three subcategories in the food category: Pickles, Relish, Peppers, Olives; Salsa; and Toppings. After you make your selections, click the Apply button to apply these settings. We recommend you "play" with this window's options for a bit to get the hang of it. The "select All" and "All" options work to select and unselect all selections. Give it a try to see how it works. After you have made your food category and subcategory selections,, you can click the "X" icon to exit this window. The food category selections you made will be remembered for you in case you want to repeat the search.
Important note:As mentioned above, your food category selections will be remembered for you. This can be convenient, BUT... it can cause you a problem if you forget that you made these selections and go to conduct another search. Your new search could be in a food category that is not the one you previously selected. This can make it appear that the food you are searching for does not exist. Type “presifted flour” in the “Search for” edit box, then click the “Search” button to start your search. Because this example specifies the AND type search, the search will only locate food Items that contain both “presifted” AND “flour” in its Food Name, Brand name or Description columns. It won’t matter what order they appear in your search… as long as both words are present anywhere in the selected columns, it will produce a hit.
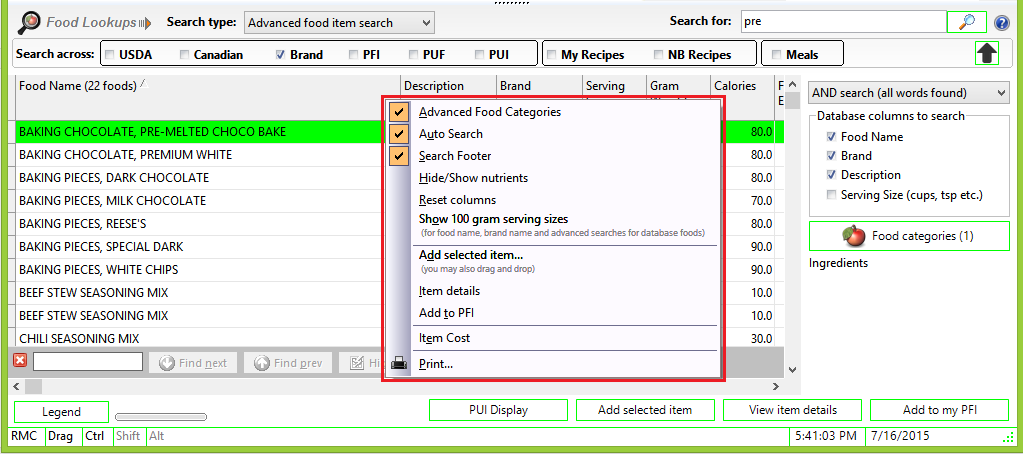
After you display your Search Results, you can click any column header to sort all the displayed data from high-to-low based on the values in that column. (This is a very popular feature.) Click the same column header again to reverse the sort order. You can do this for any nutrient. To add one of the displayed Food Items to a Food Log, Recipe, Meal, or Meal Plan (depending on which NutriBase window you happen to be in), highlight it then:
This menu gives you a variety of options:
The Auto Search option tells NutriBase to reconduct the previous search when you select another Food Category. The Search Footer option allows you to search for strings within your search results if desired. Hide/Show nutrients allows you to select which nutrients you want to display in your Search Results. Reset columns returns your nutrient columns to their original default positions (after you have rearranged them by dragging and dropping them into a new sequence). Show 100 gram serving sizes allows you determine whether you want to display food items with serving sizes of 100 grams. 100 gram serving sizes are the most common serving sizes in the USDA and Canadian databases. Many users don't want them displayed because they take up a lot of vertical display space and they make it more difficult to locate the more commonly used serving sizes. Add selected Item adds the selected item to your Food Log, Recipe, Meal, etc. Selecting Item details shows all the data for the selected food item in a single screen view. (You can also do this by simply double-clicking any food item.) Add to PFI will transfer the selected food item and add it to your Personal Foods as a PFI. (You can go back to it later and edit it as desired.) Item cost allows you to add the cost of any highlighted food item. This topic updated 07/16/2015 |
 To add one of the displayed Food Items to a Food Log (or Recipe, or Meal, or Meal Plan), highlight it, then drag and drop it into the food list in the upper left of this window. You can also highlight and click the “Add selected item” button. Or you can highlight it, right click, and select the option to “Add selected food item.”